| 일 | 월 | 화 | 수 | 목 | 금 | 토 |
|---|---|---|---|---|---|---|
| 1 | 2 | 3 | 4 | 5 | 6 | 7 |
| 8 | 9 | 10 | 11 | 12 | 13 | 14 |
| 15 | 16 | 17 | 18 | 19 | 20 | 21 |
| 22 | 23 | 24 | 25 | 26 | 27 | 28 |
Tags
- leetcode
- Github
- long video understanding
- 백준
- autogluon
- Kaggle
- hackerrank
- MySQL
- sliding video q-former
- transference
- quantification
- vision-language-action
- error
- CS285
- deeprl
- ma-lmm
- memory bank
- CNN
- Reinforcement Learning
- LeNet-5
- Linux
- Python
- Anaconda
- 용어
- multimodal machine learning
- Artificial Intelligence
- Server
- 코딩테스트
- tensorflow
- jmeter
Archives
- Today
- Total
반응형
| 일 | 월 | 화 | 수 | 목 | 금 | 토 |
|---|---|---|---|---|---|---|
| 1 | 2 | 3 | 4 | 5 | 6 | 7 |
| 8 | 9 | 10 | 11 | 12 | 13 | 14 |
| 15 | 16 | 17 | 18 | 19 | 20 | 21 |
| 22 | 23 | 24 | 25 | 26 | 27 | 28 |
Tags
- leetcode
- Github
- long video understanding
- 백준
- autogluon
- Kaggle
- hackerrank
- MySQL
- sliding video q-former
- transference
- quantification
- vision-language-action
- error
- CS285
- deeprl
- ma-lmm
- memory bank
- CNN
- Reinforcement Learning
- LeNet-5
- Linux
- Python
- Anaconda
- 용어
- multimodal machine learning
- Artificial Intelligence
- Server
- 코딩테스트
- tensorflow
- jmeter
Archives
- Today
- Total
Juni_DEV
[CNN, Tensorflow] LeNet-5 구현하기 본문
반응형

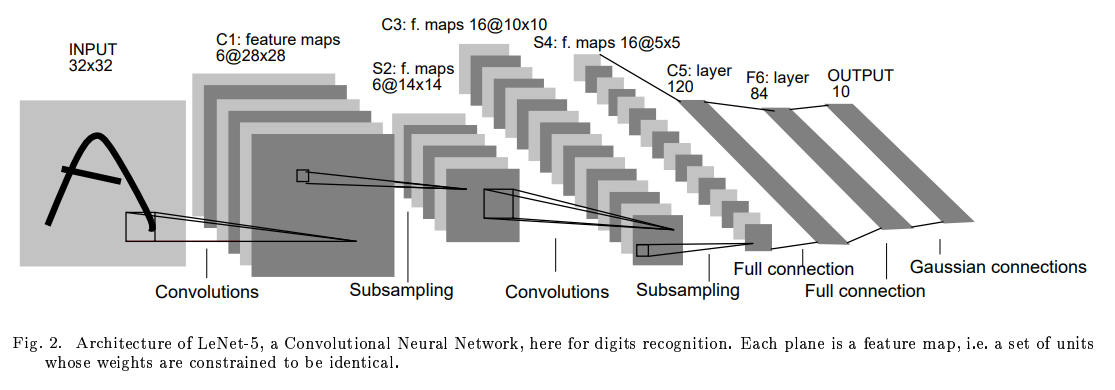
이전 글에서 pytorch로 구현해봤으니 이번에는 tensorflow를 이용해서 Lenet-5를 구현해보자
구현 완료한 Tensorflow LeNet-5 Code
https://github.com/juni5184/Paper_review/blob/main/(tensorflow)lenet-5.ipynb
GitHub - juni5184/Paper_review
Contribute to juni5184/Paper_review development by creating an account on GitHub.
github.com
(1) 필요한 라이브러리 import
import numpy as np
from keras.utils.np_utils import to_categorical
from keras.models import Sequential
from keras.layers import Dense,Conv2D,Flatten,MaxPool2D, AvgPool2D

from tensorflow import keras
from sklearn.model_selection import train_test_split
(2) 데이터 전처리
(x_train,y_train),(x_test,y_test) = keras.datasets.mnist.load_data()

# leNet-5 input size = 28x28
x_train=x_train.reshape(-1,28,28,1)
x_test=x_test.reshape(-1,28,28,1)

x_train,x_val,y_train,y_val=train_test_split(x_train,y_train,test_size=0.2)

x_train=x_train/255.0
x_val=x_val/255.0
x_test=x_test/255.0
pytorch는 torchvision에서 mnist를 제공해줬었는데
tensorflow는 keras.datasts.mnist를 제공해준다.
(3) 모델 구성
class LeNet(Sequential):
  def __init__(self,num_classes):
    super().__init__()

    self.add(Conv2D(6,5,strides=1,activation='tanh',input_shape=(28,28,1),padding='same'))
    self.add(AvgPool2D(2,strides=2))
    self.add(Conv2D(16,5,strides=1,activation='tanh'))
    self.add(AvgPool2D(2,strides=2))
    self.add(Conv2D(120,5,strides=1,activation='tanh'))
    self.add(Flatten())
    self.add(Dense(84,activation='tanh'))
    self.add(Dense(num_classes,activation='softmax'))

    self.compile(optimizer='adam',
                 loss='sparse_categorical_crossentropy',
                 metrics='accuracy')
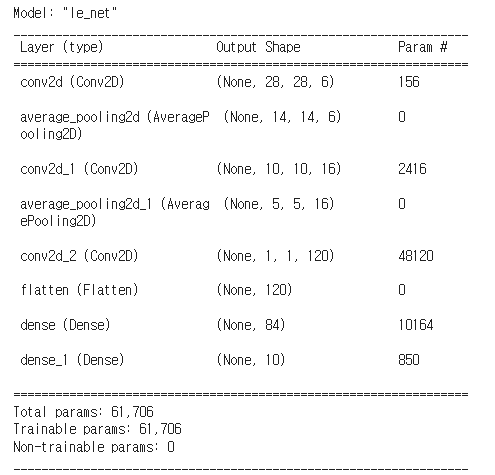
(3-1) 모델 확인
model=LeNet(10) # 여기서 10이 의미하는 바는 num_classes
model.summary()
(4) Early Stopping, Model Checkpoint (필수는 아님)
from tensorflow.keras.callbacks import EarlyStopping, ModelCheckpoint

#val_loss 값이 5번 이상 줄어들지 않으면 멈춤
early_stopping_cb = EarlyStopping(monitor='val_loss', mode='min',
                           verbose=1, patience=5)

# val_loss 가장 낮은 값을 가질때마다 모델 저장
check_point = ModelCheckpoint('best_model.h5',
                              monitor='val_loss', mode='min', save_best_only=True, verbose=1)
(5) 학습
history = model.fit(x_train,y_train,
          epochs=15,
          validation_data=(x_val,y_val),
          callbacks=[early_stopping_cb, check_point],
          )

(6) 그래프로 결과 확인
# Loss 그래프
plt.plot(history.history['loss'], c='r')
plt.plot(history.history['val_loss'], c='b')
plt.title('model loss')
plt.ylabel('loss')
plt.xlabel('epoch')
plt.legend(['train', 'val'], loc='upper right')
plt.show()

# 정확도 그래프
# plt.plot(history.history['accuracy'])
# plt.plot(history.history['val_accuracy'])
# plt.title('model accuracy')
# plt.ylabel('accuracy')
# plt.xlabel('epoch')
# plt.legend(['train', 'val'], loc='upper right')
# plt.show()

이번에도 유사한 그래프 형태가 나왔다.
역시 Tensorflow 코드가 익숙하고 더 편하게 느껴지긴 한다.
Reference
[1] http://yann.lecun.com/exdb/publis/pdf/lecun-01a.pdf
[2] https://mldlcvmjw.tistory.com/289
반응형
'Paper Review' 카테고리의 다른 글
Comments


